Dan K recently got in touch with us about a project he has been working on. He likes to home process his black & white films. We have had a dark room set up in our loft for a while, but we haven’t bitten the bullet and used it yet. Hopefully with the help of Dan K we can develop the confidence to get in there and experiment. This is quite an in depth article on different developers and methods which will hopefully be a handy reference guide for all you budding home developers!
I have been shooting film since I was a boy and in recent years, have rediscovered my love of home processed black and white film. Though no expert lab technician, I have a keen thirst for knowledge with which to improve my skill.
It is clear that the pairing of a film and developer has profound effects on the image’s texture, tones and sensitivity. Yet, I am sometimes mystified as to exactly why a photo came out as it did and I wanted to experiment to see how black and white film is affected by different developers and processing times. It turns out that the scene’s dynamic range, the camera’s exposure, and the developing method also play a significant part.
To simplify and standardize the comparison, I picked a generic landscape with a wide contrast range and an even overcast sky. Then I settled on one film. Kodak Tri-X 400 is my favourite film and is ideally suited to this experiment as it is monochrome with wide latitude and a medium grain size. I bulk loaded the cartridges from the same 100-foot roll, so there was no question of film freshness and each frame and each roll would react in exactly the same way to light and chemicals. Having locked in these parameters, I could now play around with exposure, developer chemistry and developing protocol.
I selected an aperture that should give me an exposure around the mid point of my exposure dial and took a series of images from one extreme exposure (1/4000s) to the other (1s). I quickly took shot after shot, roll after roll, until I had six identical rolls of exposed Tri-X to test develop:
1. Kodak D-76 developer at 1:1 dilution at 27°C for the standard duration
2. Kodak TMAX developer at 1:4 dilution at 27°C for the standard duration
3. Kodak TMAX developer at 1:4 dilution at 27°C for 2 stop push
4. R09 One Shot developer at 3.5ml in 300ml water at 27°C for 30 minutes
5. R09 One Shot developer at 3.5ml in 300ml water at 27°C for 60 minutes
6. R09 One Shot developer at 3.5ml in 300ml water at 27°C for 120 minutes
The developers
Kodak D-76 is an economical powder-based fine grain developer. This is my general-purpose developer. I go through a gallon (3.8 litres) of this per month.
Kodak TMAX developer is a syrup based developer; used neat from the stock bottle, it is tremendously powerful and can be used to reduce the otherwise long developing times of pushed films in cold climates. It is my standard push developer, but I almost always use it at the ‘standard’ dilution of 1:4, due to the warmer ambient temperature.
R09 One Shot is a substitute for Rodinal, the classic developer. I am told that the chemistry and characteristics are identical. I use this at high dilutions for stand development, which I am told is useful for low contrast developing of high contrast films, reduced grain and for developing films of unknown emulsion or unknown exposure.
About my developing methods
Despite the manufactured consistency of the film and developer, your results may come out a little differently to mine.
One reason is I develop in warmer temperatures than I should. Developer soak times are standardised at 20°C and most manufacturers don’t recommend temperatures above 25°C. However, I live in the tropics and I can’t get consistent temperatures with refrigerated water in a warm room. To deal with this, I have extrapolated the relationship between time and temperature to find the right developing time for my warmer climate. I have hundreds of rolls of experience developing in this temperature range so I know they’ll come out right, if a tiny bit grainier than they would come out at 20°C. Therefore, my results are indicative of what to expect, but don’t depend on them to be exact.
Another reason is my agitation regime may differ from yours. I agitate with two inversions and a tap of the tank on the bench every 30 seconds, as per standard. Stand Development is another matter entirely. There are many different ways, some people agitate at first, or halfway through. I just pour in, invert once, tap and let it sit. Agitation increases the highlights and standing brings up the shadows.
Results – “Show us the pics or it didn’t happen”
The big question is: Did these developers do what they are reputed to do?
Below are the best exposures from each roll. Note the similarities and differences of the highlight and shadow detail and the mid-tone contrast.
D-76 standard protocol

TMAX developer standard protocol

TMAX developer 2 stop push

R09 30 minutes stand development

R09 60 minutes stand development

R09 120 minutes stand development

Below, He provides some samples in finer detail, from a cropped portion of the frame:

In order from left to right: D-76 developer standard protocol, TMAX developer standard protocol, TMAX developer 2 stop push, R09 30 minutes stand development, R09 60 minutes stand development, R09 120 minutes stand development
Let’s rank them for each assessment criteria:
Sensitivity (highest to lowest)
• R09 developer for 60 minutes (1/1000s to 1/500s)
• R09 developer for 120 minutes (1/1000s to 1/500s)
• TMAX developer 2 stop push (1/500s)
• R09 developer for 30 minutes (1/500s)
• D-76 developer standard protocol (1/250s)
• TMAX developer standard protocol (1/125s)
If I recall, the scene was metering about 1/125s to 1/250s, so the Kodak D-76 and TMAX were rating correctly at 400ASA. The pushed TMAX was 2 stops higher, further confirming the extrapolated time-temperature-sensitivity curve. The one and two hour stand development was optimal at about three stops higher exposure sensitivity. The 30 minute stand development peaked about plus two stops. Strangely, the 120 minute stand development is slower by a stop than 60 minutes.
Scannable latitude (highest to lowest)
• R09 developer for 30 minutes (8 stops 1/1000s to 1/8s)
• TMAX developer for 2 stop push (maybe 7 stops 1/1000s to 1/15s)
• TMAX developer standard protocol (6 stops 1/250s 1/8s)
• D-76 standard protocol (6 stops 1/500s to 1/15s)
• R09 developer for 60 minutes (maybe 5 stops 1/2000s to 1/125s)
• R09 developer for 120 minutes (3 stops 1/1000s to 1/250s)
The latitude range above is stretching it, but this is the range within which I’d not bin the photo, but would attempt to scan and tweak the exposure in Photoshop. Your preferences may vary, so I have included thumbnail scans of the entire series, at least within the range that my scanner was able to detect an image.


All development protocols have good overexposure latitude and limited underexposure latitude. This reflects the conventional wisdom I’ve been told to expose for the shadows and that when in doubt, to have a tendency to overexpose rather than underexpose.
Stand development has incredible overexposure latitude at 30 minutes; it’s very consistent. However, as the development time goes up, the overexposure latitude gets less. The whole film frame gets very dense.
Grain
• TMAX developer standard protocol (finest)
• D-76 developer standard protocol (fine)
• R09 developer for 60 minutes (medium)
• R09 developer for 120 minutes (heavy)
• TMAX developer 2 stop push (heavy)
• R09 developer for 30 minutes (heavy)
Both the Kodak developers had the finest grain when used at standard dilution and processed for the standard duration. Push developing increases grain size, as expected.
What I didn’t expect was that stand development seemed to have coarser grain. I thought that stand development was supposed to reduce grain, as the process was slower and gentler. It also doesn’t make sense that one hour and two hour stand development has finer grain than the half hour stand development.
Perhaps it’s a subjective misinterpretation on my part.
Dynamic range
Aside from 30-minute stand development in R09, which captured absolutely everything including the very bright sky, correctly exposed images showed roughly uniform dynamic range.
Contrast (highest to lowest)
• TMAX developer 2 stop push
• D-76 developer standard protocol
• TMAX developer standard protocol
• R09 developer for 60 minutes
• R09 developer for 120 minutes
You may have noticed that I didn’t include the half hour stand development on the ranking above. I find it impossible to rate this. Indeed, for all tests, it’s proved not to be so simple!
Why? The tone curves are different. By that, I mean in each picture, the exposed highlights, mid-tones and shadows aren’t proportionally brighter and darker between tests.
The curves aren’t even linear within each protocol. Not only is the mid-tone different for each, in the case of the 30 minute stand development, I have a suspicion that some tones that were exposed lighter scanned darker than other tones that were actually exposed darker. This manifests in a look that is comparable to unsubtle and excessively executed ‘high dynamic range’ photo.
When I develop for scanning, I prefer a low contrast negative, because it means I can adjust the contrast myself later in Photoshop. This ‘HDR’-like curve is a problem, however, as it’s almost impossible to adjust an inflected tone curve within the range of that inflection. The software doesn’t know what are the highlights and shadows. All I can do is tweak the top and tail and adjust contrast and hope the viewer doesn’t notice that light bits are darker than dark bits and vice-versa.
In plain language; the 30 minute stand development scan looks odd; weird; yucky.
Conclusions
The standard developers work very well. They offer fine grain, a good balance of contrast, high dynamic range and have impressive overexposure latitude. I plan to continue using D-76 as my general developer and TMAX as my push developer. My choice of D-76 over TMAX is as much down to cost as anything else, but you may want to use TMAX for regular development if you dilute more than 1:4, or if your faucet water temperature is colder.
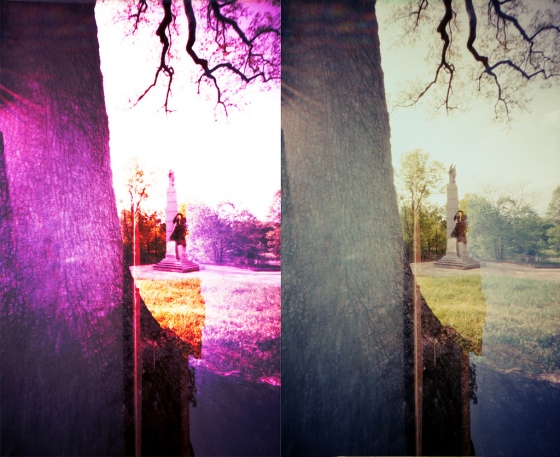
This is an image developed in TMAX, showing its handling of contrast and tone.

Below is another developed in D-76 showing its almost tactile textural qualities and photojournalistic rendition.

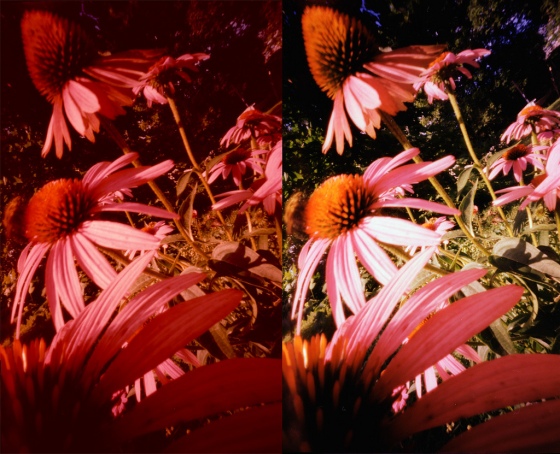
Below is another photo I took showing the use of D-76’s grain and contrast shot underexposed and developed normally using the limit of underexposure latitude. Murky shadows are deliberate.

Push developing boosts sensitivity, contrast and grain. Exposure latitude remains as good, or better as regular development. Indeed, if in serious doubt, I may choose to expose normally, but push two stops in development and rely on the latitude to save my bacon.
After evaluation, stand development is not a technique I plan to use much unless I had to stretch the latitude. Some valid reasons would include:
• shooting a ‘toy camera’ with a fixed shutter speed and fixed aperture,
• guesstimating light levels with an unmetered camera (I’m not very good at it),
• using a roll in different light conditions beyond the range of my camera’s technical exposure range (widest aperture and slowest speed to smallest aperture and fastest speed),
• developing a roll of unknown rating or unknown optimal development times, or
• push processing.
In short, stand development is a rescue technique. This is a photo I took in what I would normally consider impossible light: very low light levels and high contrast ratio with a spot light on the face and a dark jumper and dark soft in the shadows. I just set a manual exposure to 1/30s, the slowest speed I could hand hold at, and opened the aperture up to the maximum f/1.7 and let the chemistry do the rest.

I might also use stand development in unusual circumstances where I have to use a very small amount of developer with less than scientific precision. For example, I plan a trip to a developing world location where I cannot be sure that I can process film in a timely manner. By using dilutions of 1:25 to 1:200, stand development is very economical in terms of money, weight and volume. I don’t need a stop bath, and I don’t need to obsess over temperature and time. The low cost, low toxicity and high tolerance also makes it very useful for teaching development to kids.
Below are two photos where I totally messed up the development process. I got distracted and only discovered the roll about 12 hours after I started developing. I think they came out alright, although highlights were a struggle to scan and one edge of either image showed a heavy overdevelopment base fog that required careful rework in Photoshop.


I have also learned from this experiment that very long development times don’t improve stand development’s ability to handle a wider range of exposure. It makes it worse, at least for this film, this developer, this concentration and this temperature. More experimentation may yield different results.
I’m now aware that stand development will boost sensitivity from one to three stops but overexposure latitude may save me.
The final take-home message is that all these techniques can yield a good, scannable and adjustable result. Above all, it’s tremendous fun to play about. It’s time for me to get off the internet and get shooting again!
For follow-up help and more photography inspiration, follow me on twitter as ZDP189 and for an eclectic collection of my images, find me on tumblr as ZDP-189. Author maintains copyright; all rights reserved.